Shopify SEO Tips for 2024: How to Optimize Organic Traffic for your Shopify Store?
Bradley Long
Bradley Long
Imagine increasing your organic traffic for you Shopify store, improving search engine rankings, and boosting sales without spending a dime on advertising. By optimizing with these shopify seo tips your store for search engine optimization (SEO), this dream can become a reality. In this comprehensive guide, you’ll learn the ins and outs of Shopify SEO, from technical aspects to on-page tactics and everything in between. Get ready to unlock your store’s full potential and enjoy the long-term benefits of a well-optimized online presence with these Shopify SEO tips.
Key Takeaways
Optimize your Shopify store to increase ranking in search engine results, targeting relevant keywords and utilizing SEO tools.
Technical essentials include optimizing site structure, page speed & addressing common issues such as duplicate content.
Implement structured data for enhanced SERP visibility through improved product information & rich snippets.
Understanding Shopify SEO
Driving organic traffic, enhancing rankings, and boosting sales are all advantages of search engine optimization (SEO) for Shopify stores. Shopify SEO refers to the optimization of a Shopify store to increase its ranking in search engine results and draw in more visitors. Achieving such benefits necessitates targeting keywords that resonate with your store’s products and audience.
Developing a deliberate ecommerce SEO strategy can generate a consistent, long-term source of income. Utilizing various SEO tools can help you optimize your Shopify store more effectively and efficiently. Be mindful of potential SEO issues, such as eliminating duplicate URLs and superfluous Shopify apps, and optimizing your store for other search engines besides Google to increase organic traffic.
Technical SEO Essentials for Shopify SEO
Optimizing a website for search engine crawlers is referred to as “Technical SEO”. This requires good page speed and device-responsiveness for different mobile devices. These factors contribute to improving your Shopify store’s search engine ranking. A robust technical SEO strategy significantly enhances site structure, optimizes for mobile devices, and improves page speed.
Some common technical SEO issues in Shopify include duplicate content, improper canonicalization, and poor internal linking structures. Addressing these issues can improve user experience on your Shopify store and increase your chances of ranking higher in search engine results.
Site Structure
An SEO-friendly site structure for Shopify could involve a simple hierarchy, such as: Homepage » Category Pages » Product Pages or Homepage » Category Pages » Sub-Category Page » Product Pages. A well-organized site structure is critical for SEO as it assists in enhancing user experience and search engine crawling. Straightforward navigation aids SEO for Shopify sites, ensuring efficient access to your pages for shoppers on various devices.
One common issue with Shopify’s default site architecture is that Google receives conflicting signals, leading to potential SEO problems. By proactively managing these issues and optimizing your site structure using a google search console account, you can enhance user experience and search engine rankings, driving more organic traffic to your store.
Robots.txt and Sitemap.xml
A robots.txt is a file that informs search engine spiders which pages to crawl and which pages to ignore. It is beneficial for SEO as it allows search engine spiders to crawl and index the website in an efficient manner. Shopify produces a robots.txt file for your store which contains pre-defined “Disallow” instructions. This allows your store to limit the pages and files that can be requested by search engines. The URL path for Shopify’s sitemap.xml index file is typically “domain.com/sitemap.xml”.
A sitemap is a file containing all the links to all the pages of a website, providing a comprehensive overview of the site structure. It is critical for SEO as it informs search engine spiders what to crawl/index on the website regularly. Shopify offers a sitemap for all stores as a standard feature, and generally, the Shopify sitemap.xml is suitable for use as-is.
Mobile Optimization
With mobile commerce estimated to account for 44% of all ecommerce by 2024, and 69% of sales during a Black Friday weekend being on mobile, optimizing your Shopify store for mobile users is more important than ever.
Mobile optimization offers several benefits:
Improves user experience
Increases page load speed
Boosts mobile rankings
Positively impacts search engine rankings
Drives more organic traffic
You can view the proportion of mobile visitors to your Shopify store in the Analytics section under “Online store sessions by device type”. Ensuring your store has a responsive design will optimize visual presentation across all devices, enhance user experience, and encourage visitors to stay on the site longer.
Page Speed Optimization
Page speed is a critical factor for both algorithms and customers. Studies have indicated that 79% of shoppers who experience slow loading speeds are unlikely to return to the site for further purchases, while 47% of online shoppers expect a page to load within two seconds. Therefore, enhancing user experience and search engine rankings requires optimizing your Shopify store’s loading speed.
Some strategies for optimizing Shopify site speed include:
Implementing lazy loading for images
Compressing images
Removing apps with low usage
Resizing and compressing large images
Migrating tracking codes to Google Tag Manager
Enhanced site speed increases the likelihood of retaining customers and attracting new ones.
On-Page SEO Tactics for Shopify Stores
On-page SEO tactics are integral to improving your Shopify store’s search engine rankings and attracting organic traffic. These tactics include:
Keyword research
Metadata optimization
Content creation
Image optimization
Mastering these on-page strategies lays a solid foundation for your store’s SEO success.
A well-executed on-page SEO strategy can help your store rank higher in search engine results, drive more organic traffic, and ultimately increase sales. In the following subsections, we’ll dive deeper into each on-page tactic to help you fully optimize your Shopify store.
Keyword Research
Keyword research is the process of identifying the terms that users input into search engines when looking for a product or service. It is essential for Shopify SEO as it enables you to:
Target the correct audience
Optimize your content for the right keywords
Conduct thorough keyword research to identify relevant and high-converting keywords for your Shopify store.
To conduct keyword research for your Shopify store, you can:
Export keyword data from Google AdWords
Analyze AdWords keywords with high conversion rates
Assess current keywords in Google Search Console
Utilize Moz’s Keyword Explorer
Run competitors through tools like Ahrefs
Employ MergeWords to generate keyword variations
Targeting the right keywords enhances your store’s visibility in search engine results pages and attracts more organic traffic.
Metadata optimization involves enhancing the title tags, meta descriptions, and URLs of your Shopify store’s pages to improve search engine rankings and click-through rates. The title tag and meta description tags should incorporate keywords relevant to the page content. It is suggested that the title should have a maximum of 60 characters, and the description tag should have a maximum of 160 characters.
Creating unique page metadata assists search engines in comprehending the content of the page and consequently, enabling improved placement in search results. Optimizing metadata, which involves incorporating appropriate keywords in page meta descriptions, title tags, and URLs, enhances your store’s search engine visibility and maximizes click-through rates.
Content Creation
Creating unique, engaging, and keyword-rich content is crucial for attracting organic traffic and improving search engine rankings. When creating content for your Shopify store, ensure that it is original and adds to the overall user experience. Incorporating targeted keywords naturally and strategically throughout the content enhances its visibility and relevance to search engines.
To create valuable content for your Shopify store, consider conducting keyword research to identify relevant topics and prioritize them when writing blog posts. Creating high-quality content that resonates with your target audience helps establish your niche authority, attract organic traffic, and boost sales.
Image Optimization – Shopify SEO Tips
Image optimization is critical for SEO as it assists in enhancing page load speed and search engine visibility. Optimizing images with proper file names, alt tags, and compression enhances your store’s visibility in search engine results and increases page load speed.
When crafting alt tags for images on a Shopify store, it is important to ensure they are descriptive, pertinent, and include relevant keywords. The Alt Text Shopify SEO app can assist with adding alt text to images, making it easier for search engines to understand the content of your images and improving your store’s overall SEO performance.
Building High-Quality Backlinks
Building high-quality backlinks is an essential aspect of SEO, as it enhances domain authority, search engine rankings, and organic traffic. Link building is a process of connecting with various online brands and publications. Through this, you can determine if they are willing to link to your website page from their own site. A higher number of links displays more trustworthiness to Google, leading to higher rankings in search results for your store.
Some strategies for building high-quality backlinks include guest blogging, utilizing the Skyscraper technique, and acquiring unlinked mentions. A strong backlink profile enhances your store’s search engine rankings, attracts more organic traffic, and boosts sales.
Harnessing the Power of Blogging – Shopify SEO Tips
Blogging is a powerful tool for creating valuable content, attracting organic traffic, and establishing authority in your niche. Consistent publication of high-quality blog content enhances your Shopify store’s search engine rankings and drives more organic traffic.
To harness the power of blogging for your Shopify store, follow these steps:
Conduct keyword research to identify relevant topics and target keywords.
Create engaging and informative blog posts that address your target audience’s needs and interests.
Provide valuable content that resonates with your audience to establish niche authority.
Attract more organic traffic to your store.
Utilizing Shopify Apps for SEO
Shopify apps are tools that can be integrated into a Shopify store to provide extended functionality without requiring manual code adjustments. Utilizing the right Shopify apps for SEO can help improve your store’s search engine performance. Here are some benefits of using Shopify apps for SEO:
Increased visibility in search engine results
Improved website speed and performance
Enhanced user experience
Advanced analytics and reporting
Integration with other marketing tools
By leveraging these benefits, you can make it easier for potential customers to find your products online.
Some Shopify apps that can assist with SEO optimization include:
Crush.pics
Schema App Total Schema Markup
Smart SEO
Yotpo Reviews
Rewind Backups
Incorporating these apps into your Shopify store enhances various SEO aspects like image optimization, structured data, and keyword research, improving your store’s visibility in search engine results.
Monitoring and Measuring SEO Success
Tracking and measuring your Shopify store’s SEO performance is crucial for continuous improvement and ensuring your optimization efforts are delivering results. Monitoring key performance indicators (KPIs) and utilizing analytics tools provide insights into your SEO strategy’s success and inform data-driven decisions to enhance your store’s search engine rankings.
Key performance indicators (KPIs) to consider when evaluating SEO success for Shopify stores include:
Organic revenue and transactions
Organic traffic
Search rankings
Average order value (AOV)
User engagement
Regular tracking of these KPIs and necessary adjustments to your SEO strategy ensure continuous improvement and long-term success for your Shopify store.
Avoiding Common Shopify SEO Pitfalls
In your quest for Shopify SEO success, it’s essential to be aware of common SEO mistakes made by store owners. Avoiding these pitfalls helps your optimization efforts yield optimal results and prevents any negative impact on your store’s search engine rankings and organic traffic.
Some common Shopify SEO pitfalls include:
Focusing solely on link building without considering the quality of the links
Neglecting content marketing
Failing to optimize images with proper file names, alt tags, and compression
Mindfulness of these potential issues and proactive addressing can enhance your store’s search engine rankings and attract more organic traffic through an optimized search engine listing preview.
Implementing Structured Data for Enhanced SERP Visibility
Implementing structured data on your Shopify store provides search engines with additional product information and improves your store’s visibility in search results. Structured data is a standardized format for supplying extra information about a webpage to search engines, which can enhance a website’s visibility in search results and give more context to search engines regarding the content on the page.
Shopify includes structured data and rich snippet functionality for product pages as part of its free themes. If your Shopify theme does not include this, you may consider using a third-party app or custom coding to display user-generated content and star ratings in SERPs. Additionally, Shopify sites may benefit from expanding the Product structured data to collections pages by using the “CollectionPage” or “OfferCatalog” schema.
Summary
In conclusion, optimizing your Shopify store for SEO is a crucial step towards increasing organic traffic, improving search engine rankings, and boosting sales. By mastering the technical aspects of SEO, implementing on-page tactics, building high-quality backlinks, harnessing the power of blogging, utilizing Shopify apps, monitoring and measuring SEO success, avoiding common pitfalls, and implementing structured data, you can unlock your store’s full potential and enjoy the lasting benefits of a well-optimized online presence.
Frequently Asked Questions
What is the best way to SEO a Shopify website?
Optimize your site structure, improve user experience, research target keywords, optimize product pages, build links to your store, rank higher with content marketing, and use the best Shopify SEO apps and tools to get the best SEO results for your Shopify website.
Is SEO difficult in Shopify?
Overall, Shopify is not difficult to optimize for SEO. It comes with many pre-built settings that help eCommerce businesses reach their SEO goals.
What is the significance of conducting keyword research for Shopify SEO?
Keyword research is key to successful Shopify SEO, as it allows you to identify the right keywords and target the right audience, resulting in increased search engine rankings and organic traffic.
What are the benefits of optimizing images for SEO?
Optimizing images for SEO can significantly boost page load speeds and search engine visibility, leading to higher rankings and increased organic traffic.
What Shopify apps can assist with SEO optimization?
Shopify apps such as Crush.pics, Schema App Total Schema Markup, Smart SEO, Yotpo Reviews, and Rewind Backups can help with SEO optimization.
How do you go about improving your Shopify SEO? You know that there’s gold to be found in good SEO but where do you start?
It’s no small task to optimize your store’s SEO but if you break it down into bite-sized chunks and use the right apps along with one of the top premium Shopify themes you can get the job done.
44% of people start their online shopping journey with a Google search (nChannel).
37.5% of all traffic to e-commerce sites comes from search engines (SEMrush).
23.6% of e-commerce orders are directly tied to organic traffic (Business Insider).
What does that spell out for your e-commerce business? It means SEO needs to be a top priority if you want long-term sustainable buyers.
Before transitioning into E-Commerce Conversion Rate Optimization, I started my freelance career as a local SEO consultant and quickly realized how little most business owners know and that they rarely have time to learn everything about SEO and keep on top of the constantly moving goal posts after every major Google algorithm update.
This leaves anyone looking to outsource their Shopify SEO to an agency or freelancer open to being taken advantage of. That’s why I wanted to put this checklist together so even if you don’t have the time to do it all yourself you can keep on top of what the agencies are doing. Without it, they can easily pull the wool over your eyes.
The Direct Link Between Increasing Your Sales & Improved Rankings
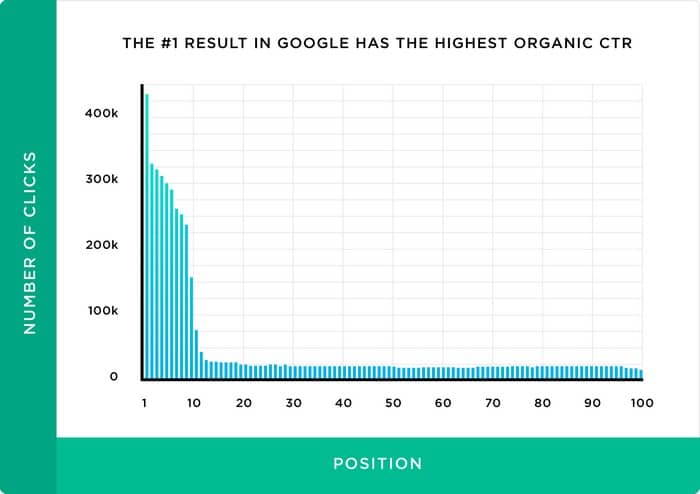
There’s a staggering difference between the amount of clicks you get from being in the first position vs the second. It can often be as much as double.
Backlinko analyzed CTR data across 874,929 pages and 5,079,491 search queries and discovered that:
1. The #1 result in Google’s organic search results has an average CTR of 31.7%.
2. The #1 organic result is 10x more likelyto receive a click compared to a page in #10 spot.
3.Organic CTR for positions 7-10 is virtually the same. Therefore moving up a few spots on the bottom of the first page may not result in more organic traffic.
Think about it, there’s psychological phenomena to being number one, it’s almost like Google are giving their recommendation for the top-ranked store so most people will click on the top-ranked store.
What Kind of Increase in Sales Can You Expect?
It makes sense that the worse your starting position the more growth potential you have from improved SEO. If you’re already ranked in the top 3 for most of your top keywords then the growth may be less significant.
Another important thing to consider is that content is king. In general terms, a store with thousands of SKUs has more ‘bandwidth’ to prosper from SEO than a single product store.
Having said that, the quality of your content makes a huge difference. If you have 1000 product pages all with generic product descriptions, copied from your suppliers’ websites then Google will penalize you for it.
An easy way to get your content ranked rather than arbitrary blog posts is to produce quality buyer guides (a bit like this guide). Blog posts rarely get any traction because they are not what your shoppers are searching for.
Don’t get me wrong, if you’re a hopeful dropship or print-on-demand store owner bootstrapping your store’s growth with SEO is going to be a hard slog. It’s unlikely that you’ll ever dominate the search engine results pages (SERPs) with a few tweaks here and there. SEO is a serious business with serious rewards but it takes time and investment.
Is Shopify SEO-friendly Out-of-the-Box?
People looking for the perfect e-commerce platform often ask this question and the simple answer is a resounding, yes!
Shopify have built their platform with SEO in mind and there’s no reason why it would limit your performance.
The only limitations are ones caused by not following this guide properly or bloating your store with too many sluggish apps and failing to use a fast-loading Shopify theme. (That’s why we created an SEO-friendly Shopify template, the Shoptimized™ Theme.)
Built-in Shopify SEO Best Practices You Can Safely Ignore
Shopify handles the following SEO best practices out-of-the-box so you can safely ignore them:
Sitemap.Xml Generation
The sitemap makes it easy for the Google bots to discover and crawl all the key pages on your store. Without it, Google may not know that a page exists so cannot display it in the SERPs. Generating your sitemap is all done auto-magically by Shopify although you can remove pages from it if you need to. You can review your sitemap at yourstore.com/sitemap.xml
Robots.Txt Generation
The robots.txt file dictates how Google crawls your pages. It blocks Google from crawling irrelevant pages like /account, /register and /cart. It also blocks them from crawling duplicate content in product filters where the filters create new pages with the plus symbol.
You can review the file at yourstore.com/robots.txt. As of July 2021, you can now edit the robots.txt file if you need more customization over the allow and disallow rules.
Dynamic Parameters
A dynamic parameter follows the ‘?’ you often see in URLs. The ‘&’ symbol is also often included in a URL to allow for more dynamic variables. Here’s an example URL with several dynamic variables:
These URL parameters can be problematic if mishandled because users can’t tell what the page is about. Plus Google often ignores three or more dynamic parameters.
Nevertheless, on the whole, Shopify stores don’t use dynamic parameters in their URLs so it’s a non-issue.
Server Speed
It’s no secret that Google places a huge emphasis on page-load speed and if Shopify’s servers weren’t at the bleeding edge of technology it would be a huge problem. Luckily their CDN servers are blisteringly fast and have near unlimited bandwidth. This is a massive headache that Shopify takes away from you if you’re thinking about migrating from another platform like Magento.
Outdated, Hackable Software
Thankfully, like their server speed, Shopify takes security deadly seriously too. This means that whilst no software can be 100% hacker-proof, Shopify is way in front of other platforms like WordPress. Hackers typically inject hidden links into your pages that point to dubious websites that Google’s bots pick up on and penalise you for.
This blog uses WordPress and believe me, it’s a constant worry as WordPress hacks are rife and they can kill your rankings.
How to Get the Most Out of This Shopify SEO Guide
The purpose of this Shopify SEO Checklist is a reference guide that you can use every time you create a product page. A category page. Or any content on your e-commerce site.
If you want to get more targeted traffic for your products, this is your guide. But first, you need to benchmark where your store is at so you can define your SEO goals and measure the improvements.
But before we get to that, there’s no point auditing anything without knowing your target keywords…
Where it begins (Keyword Research)
Keyword research is the backbone of your entire strategy. Why?
Because it contains the data to make you the most money.
Without keywords, you can’t:
Optimize your product descriptions for maximum conversions
Sub-divide your category pages for helping customers find what they want
Create an easy-to-use navigation menu so customers want to stay on your site
In short, keywords are the birthplace of your customer’s intent to buy from you.
It’s how they search. It’s how they find you (and buy).
Finding Keywords That Don’t Suck for Your Category and Product Pages
You could use any number of keyword generators to get keyword ideas. But that’s not what we’re doing.
We want to go after commercial intent.
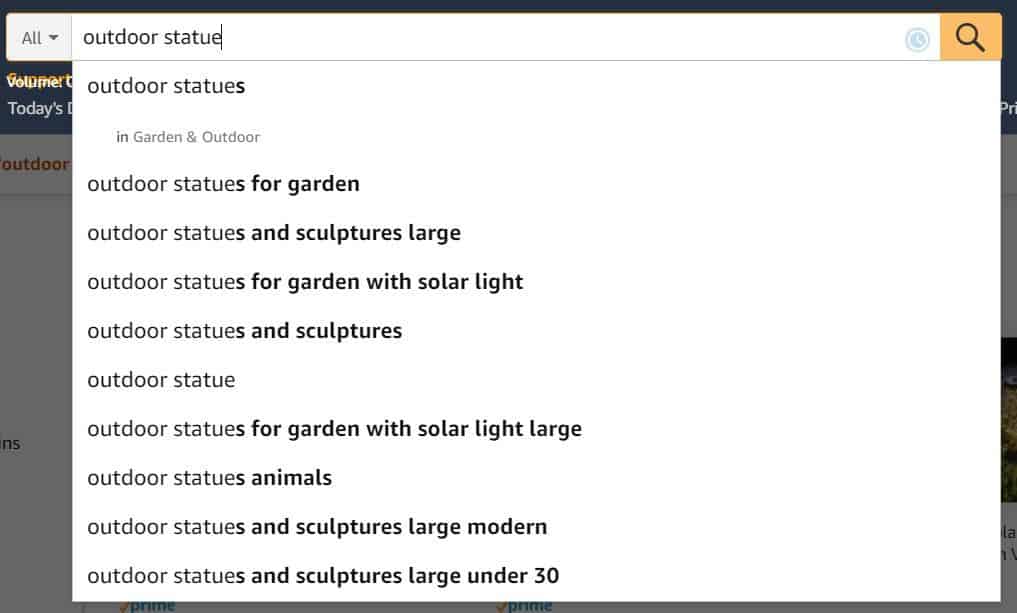
How can we find keywords that show the intent to buy? A competitor, of course. And what better competitor than the biggest giant of them all. Amazon!
Amazon
Chances are, Amazon is a competitor of yours.
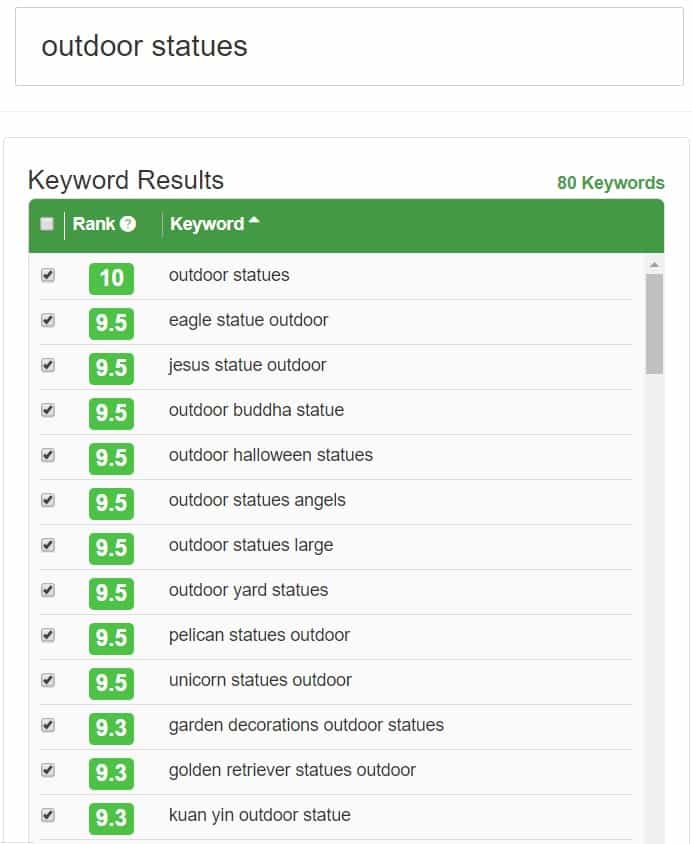
Let’s say you sell outdoor statues.
Notice how these keywords aren’t necessarily “spin-offs” of other keywords? Rather they are extensions of what you typed.
These are long-tail keywords. Not only do these tend to convert better when people use them, but they are less competitive too.
I think you can agree that an ‘outdoor statue for garden with solar light large‘ is a tad more specific than ‘outdoor statue‘.
You should do this for the main product categories you sell.
It’s time we bust out Google Sheets and start copy/pasting some keywords into a spreadsheet.
Google Sheets
After drilling deep into Amazon’s product categories, I landed here.
We start to see other things that our store could be selling or ways to categorize what we sell.
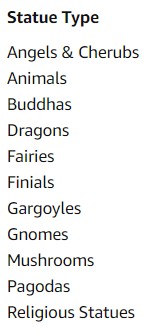
Another great thing to take a look at is any filter settings.
If I click “See more” for material, I can see how many products are in each category.
This gives some insight into what is the most popular type. There is also another filter type.
This gives me ideas of how to categorize the different statues on my site.
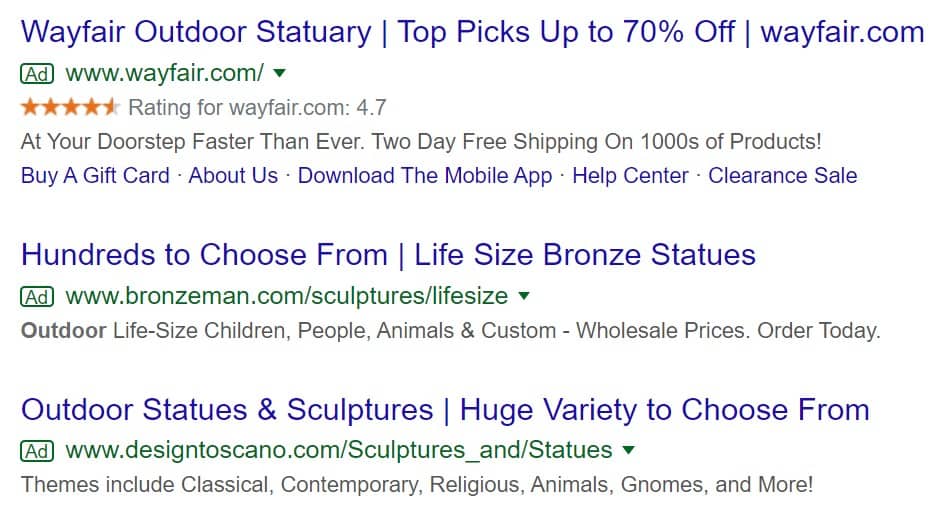
Another great idea is to simply google for your product and see who comes up first on the list.
Search, then look and see who is running ads. We can also look at organic rankings, but I’m curious to see the paid contenders right now.
Let’s see how this third site categories its products.
I would try the second one, but I know that they only sell bronze statues.
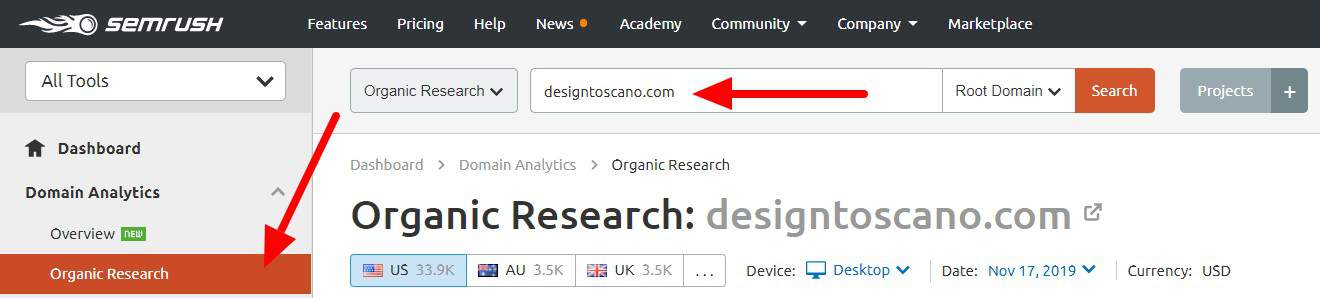
SEMrush
SEMrush shows you what keywords your competition is ranking for. This is important because this can help you figure out “where the money is” in the keywords.
Let’s see what this competitor is ranking for, organically.
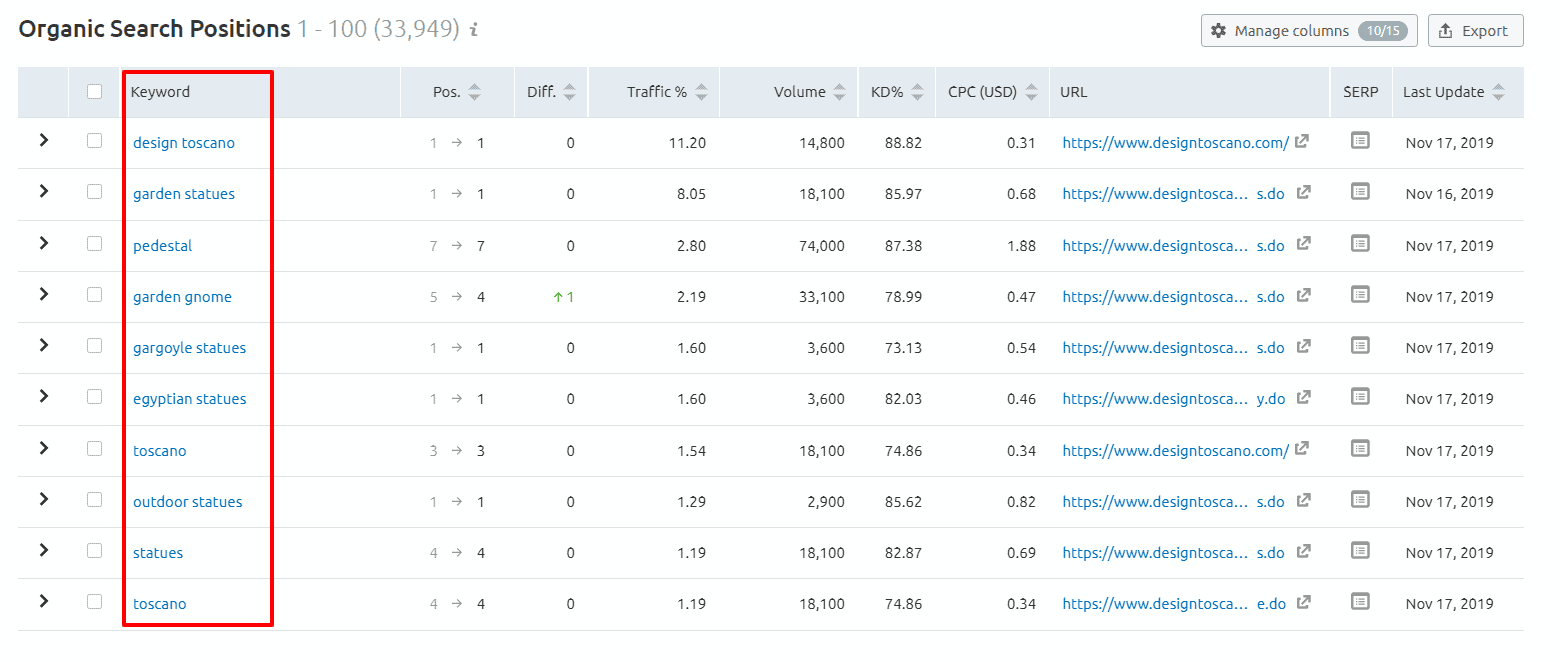
With this, we get some great insight into other keywords. Not only that but keywords that this competitor finds valuable enough to try to rank for.
We also get to see:
Their average SERP (Search Engine Ranking Position)
The traffic % this keyword makes up in their total traffic
Keyword volume
Keyword difficulty to rank organically
Cost per click on Google Ads
If you want to go a step further, click over to Competitors.
Then check out the list of domains that SEMRush thinks are this site’s competitors:
Repeat this process of organic research with each domain, you’ll have more keywords than you know what to do with!
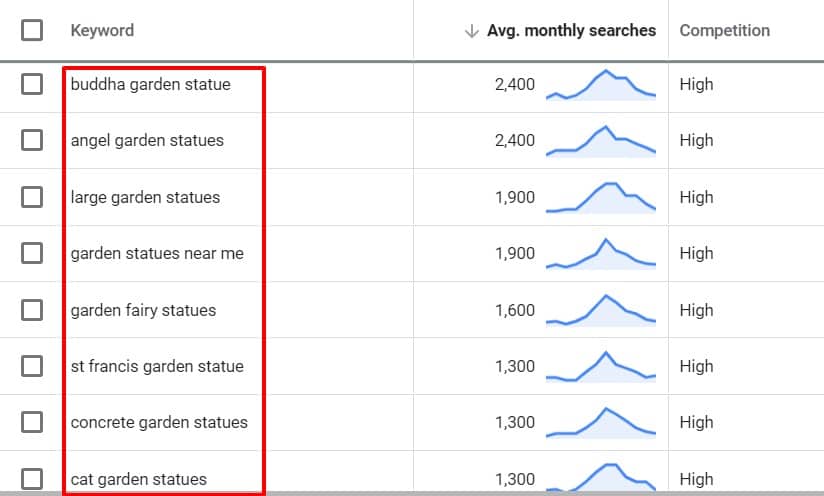
Google Keyword Planner
Google Keyword Planner is a good 100% free tool at showing some of the more basic, but necessary information.
It’s nice to be able to sort based on volume. Not to mention the ability to look at a multitude of keywords without being pestered into a trial of something.
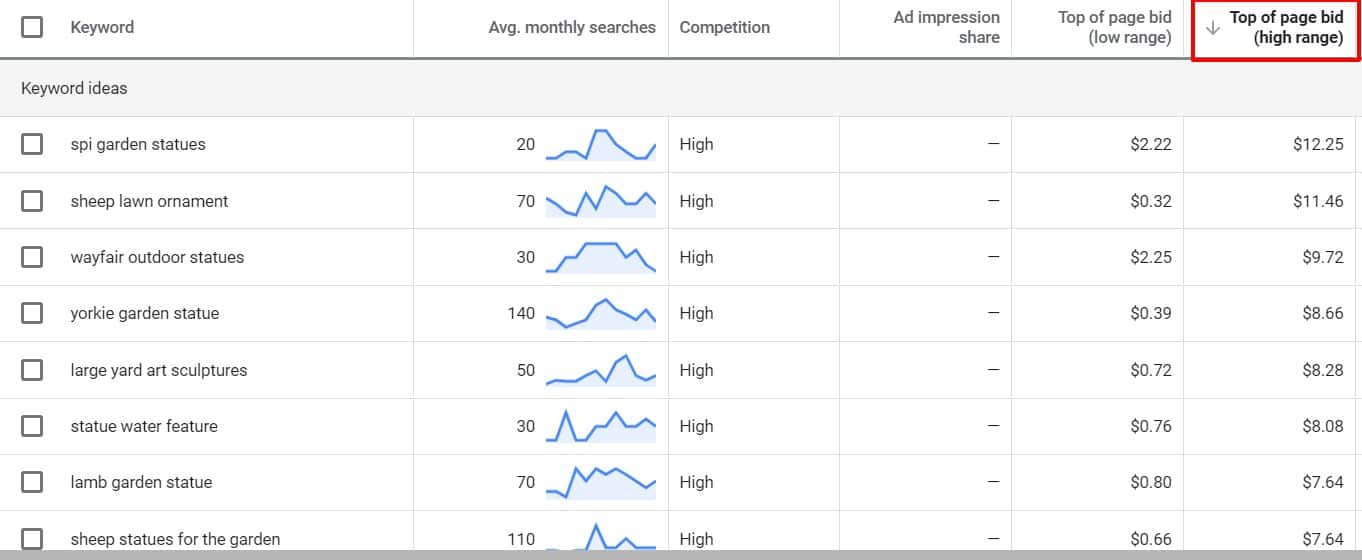
We can also sort by cost per click and see what people are paying to show up for these keywords.
Keyword Dominator Tool
You can also use Keyword Dominator Tool. It will help you find more Amazon searches that are relevant to your product.
You can add them to your keyword list and then download them to a CSV.
I’ve consulted and written content for tons of e-commerce sites. I’ve seen some shit.
A lot of e-commerce site owners optimize their pages willy-nilly. Using random keywords.
They use keywords that aren’t the best choice to get the most traffic.
This is a big mistake. Category pages don’t convert as well as your product pages, true.
But it makes sense to spend time finding keywords for categories. They become the foundation for product pages.
So how do we do that? Again, looking at competitor categories.
I Have Keywords. Now What?
So, now you’re probably wondering what keywords you should pick for your category pages and your e-commerce product pages.
Here’s a 3-step foolproof checklist to figure out what the best picks are.
#1 Search Volume
This is the most important metric when evaluating a search term, hands down.
If no one searches for X, then it doesn’t really matter how well X’s product page is. Or how hard it is to rank for X.
How much is enough? It’s hard to say. Sometimes for certain products, 100 searches could be a lot. If you’re selling houses, that’s huge. If you’re selling garden statues, not so much.
Even 10k monthly volume might be a painfully small number depending on what you’re selling.
Seasonality. You want to keep in mind seasonal variations when you search.
You may be searching during a high-tide moment in time for a given keyword. And that would suck to base a category (or business) on a keyword without knowing the full story.
(Example: all garden statue searches peak in May)
#2 Conversion
So now that you have a list of keywords that you’d like to rank for before you spend a minute on your SEO efforts wouldn’t you like to know if those keywords convert into buyers first?
This is a huge mistake I see a lot of store owners make. They launch headfirst into their SEO efforts only to find that they’ve spent months and a lot of money getting ranked for a keyword that just brings them tire-kickers.
It’s far wiser to spend a little money on pay-per-click ads first to see which keywords from your list convert best.
Setting up ads is relatively simple, managing them to avoid emptying your bank account is trickier. We’ve written a comprehensive guide to Google Ads for Shopify and you can grab it for free.
#3 Keyword Difficulty
Keyword Difficulty (also known as “SEO difficulty” or “keyword competition”) is basically determining how difficult it will be to rank for a specific keyword.
It’s a critical part of your keyword research process because it allows you to decide which keywords are the lower hanging fruit vs the super hard ones.
Keyword difficulty is based on several factors, including domain authority, page authority, and content quality.
The trouble is, there’s no consistency between the various tools that calculate keyword difficulty because only the Google Gods truly know. Having said that, any of the tools will give you an indication as to how big of a mountain you’ll need to climb. SEMrush is a great paid tool and MOZbar is a free option.
Part 2
Assessing Where You’re At – Shopify SEO Audit
Before you launch into any kind of Shopify SEO work, it makes sense to analyze where you’re currently at in terms of SEO performance. This way, you can set a baseline and measure improvements from there. Importantly, it will also highlight any major problem areas that you need to tackle first.
Pro Tip: If you want to optimize your baseline performance with one of the top premium Shopify themes that’s already SEO-optimized, the Shoptimized™ Theme takes care of a lot of the SEO headaches for you.
To establish a baseline, you’re going to need two essential free tools; Google Analytics and Google Search Console:
1. Google Analytics
“Without instruments, you’re going to eventually crash.” These were the words of my business mentor twenty years ago when I was running a construction business by the seat of my pants. His words are every bit as applicable to e-commerce as they are to any business.
And the best way to track and measure your store’s performance is Google Analytics. It’s great for tracking your key business metrics like Conversion Rate, Visitor Value, and Average Order Value, but it’s also a fantastic tool for benchmarking your SEO efforts and measuring improvements.
If you haven’t got Google Analytics set up on your store already, here’s Shopify’s guide on it.
2. Google Search Console
This tool (as well as Bing Webmaster Tools) plugs the gaps that Google Analytics leaves and gives you some imperative information about your Shopify store and how it’s viewed in the search engines’ eyes.
GSC will quickly become your go-to tool for monitoring your store’s SEO-related factors like crawl errors, mobile usability, broken pages, schema markup, and inbound links to your store.
So now that you have both GA and GSC set up here’s what you need to do:
Uncover Index Gaps
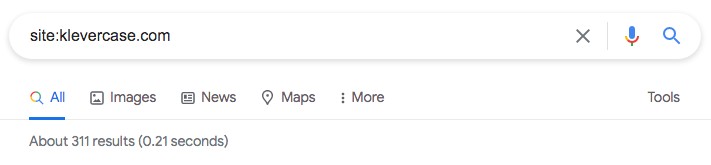
Go to google.com and enter the following (without the quotation marks) “site:yourstore.com”. This will tell you how many pages from your store have been indexed by Google.
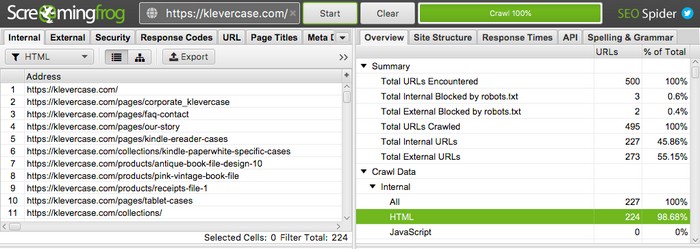
The next step is to do a gap analysis between how many pages are indexed and how many are crawlable by an SEO spider tool like Screaming Frog. It’s free up to 500 crawlable assets, you just need to download it to your computer and run it.
From the example above we can see that ScreamingFrog returns more than 311 results so in this case, it would be worth upgrading to the paid version to get the full picture.
In fact, a spider tool will rarely scan fewer pages than Google has indexed. This is because the robots.txt file blocks Google from crawling and indexing certain pages.
Once you have the full results you can export them to a spreadsheet and begin your index gap analysis. There are two key questions you need to ask:
Which URLs are being indexed that shouldn’t be?
Which URLs aren’t being indexed that should be?
Copy and paste the URLs that should and shouldn’t be indexed to a separate tab or spreadsheet and get to work.
One of the key reasons that the spider tool can crawl more pages than Google has indexed is because of poor site architecture. Generally, this isn’t such a big deal for Shopify stores because of their rigid page structures for /pages, /products, and /collections.
Having said that, if your site architecture has gotten messy and a page is buried 4 or more clicks away from your homepage, you’ll need to do some housekeeping so Google can find it and index it. We’ll address poor site architecture later on in this guide.
The Proper Way to De-Index Shopify Store Pages
If you have pages indexed in Google that you don’t want to be, there’s a right way and a wrong way to remedy it.
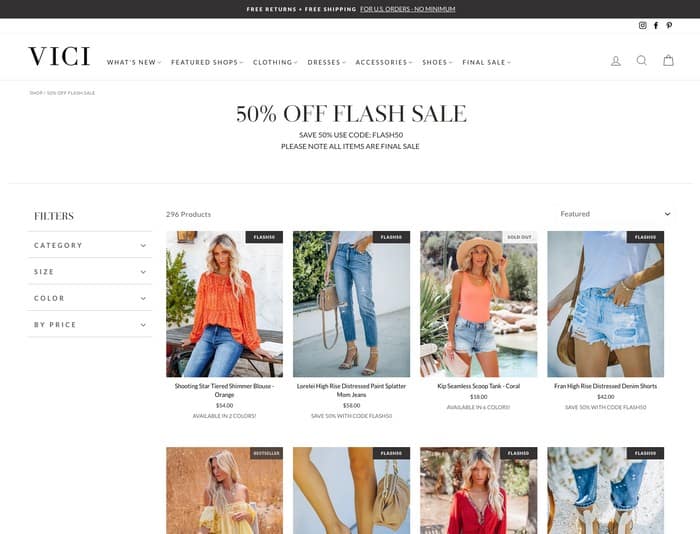
Let’s say you created a new collection page for a 50% off flash sale and the promotion has ended but you’re still getting traffic to the page via Google. Obviously, you don’t want to keep sending traffic to a page that’s full of out-of-stock products (assuming the sale went well) or products where you’re giving away too much margin.
Vici’s 50% off flash sale has its own dedicated collection but having this permanently indexed in Google could be problematic.
The wrong (and most common) way to de-index a page is by editing your theme’s liquid code with a noindex or nofollow rule for the page you want de-indexed. The trouble is that the page is still discoverable via the sitemap or from other links on your store.
The right way to de-index a page is to find the page or collection that you want to de-index and create a metafield with the following value:
This will add a nofollow and noindex rule to the page, remove it from the sitemap and remove it from the site search.
Google Search Console Crawl Stats Report
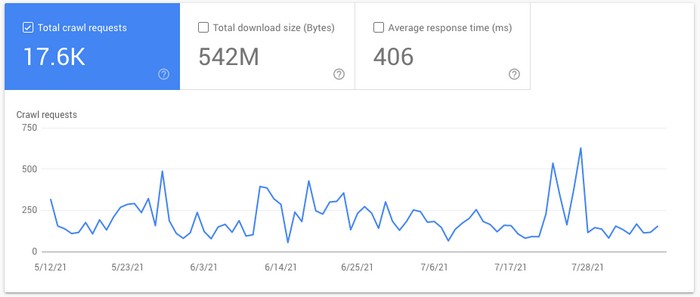
The crawl stats report gives you an overview of how many pages Google sees on each scan. Look out for sharp spikes or dips or a peak that was higher than the total indexed pages on the site.
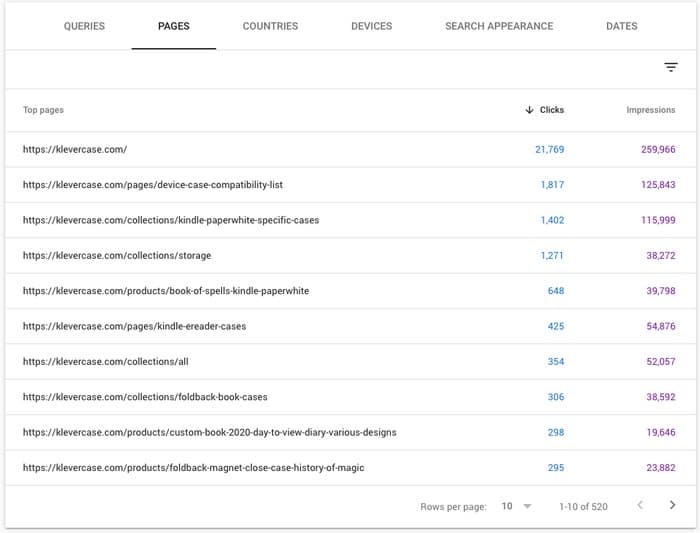
So from our example earlier, if you remember, Klevercase has 311 indexed pages but you can see that more than 500 pages were crawled in late July.
The increase could be from new products/collections being added or the submission of a new sitemap.
The good news is that the image below shows the frequency we would expect for this store since the weekly spikes correspond to the <changefreq> parameter in the sitemap.
Lifetime Organic Traffic Drops
Lifetime organic traffic drops can be caused by either slow attrition or a sudden drop caused by a Google Algorithm update. If your store has been affected by an update, you’ll be able to correlate it with Moz’s Google Algorithm Change Log against your organic traffic in Google Analytics.
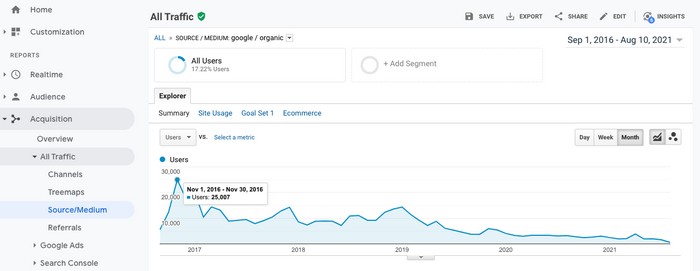
A sudden drop will be obvious but slow attrition is harder to spot without keeping a keen eye on your metrics. You’ll find the report in Google Analytics under Acquisition and then select Source/Medium as shown below.
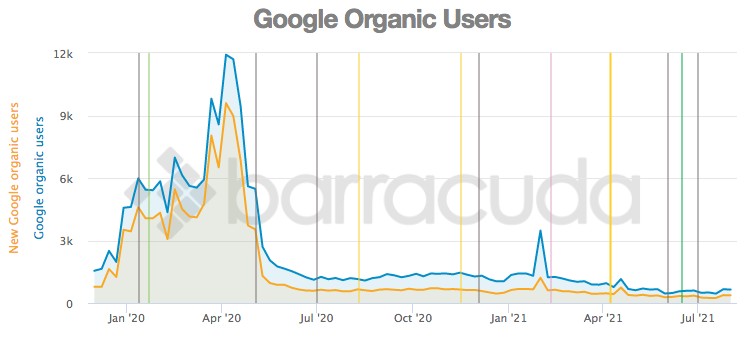
Alternatively, Barracuda’s free mapping tool overlays the algorithm updates on your organic traffic report so you can correlate the dates more easily.
Barracuda’s Panguin Tool shows exactly when an algorithm update occurred making it easy to correlate a drop in organic traffic.
Slow attrition is symptomatic of not keeping on top of your SEO. Causes to investigate are a Google update resulting in a minor penalty, increased competition, or short-lived and dubious SEO practices.
Like I said in part one of this article series, unless you’re clued-up about good and bad SEO practices, you can easily be taken advantage of by unscrupulous SEO agencies or freelancers and get penalized by Google. So-called ‘Black Hat’ SEO will cost you dearly, Google penalties can take weeks or even years to recover from.
If you have competitors hot on your heels then you can’t afford to drop the ball with your SEO efforts. In part one, I also showed you how the number one spot gets the lion’s share of the traffic and sales so you have to maintain your rankings or leapfrog your competitors.
SEMRush is a handy tool for keeping track of your keywords’ performance. It’s a great sanity check and also plugs some of the gaps that Google Analytics and GSC leave.
Manual Actions – Google Search Console
If you get a ‘Manual Action’ notification it’s a screaming priority for you to fix it and fast. You’ll only ever get a notification when a human reviewer at Google has determined that pages on the site are not compliant with Google’s webmaster quality guidelines.
Common causes are if your site has been hacked and littered with third-party spam or unnatural links. I’ve never seen it on a Shopify store but plenty of times with WordPress sites.
Site Architecture
Site architecture relates to structuring your site in an SEO-friendly way as well as having good housekeeping and usability.
Collections
Your store’s collection pages need to have a logic to them that not only instantly tells your visitors what they’re likely to find when they view your collection but also tells the search engines the same.
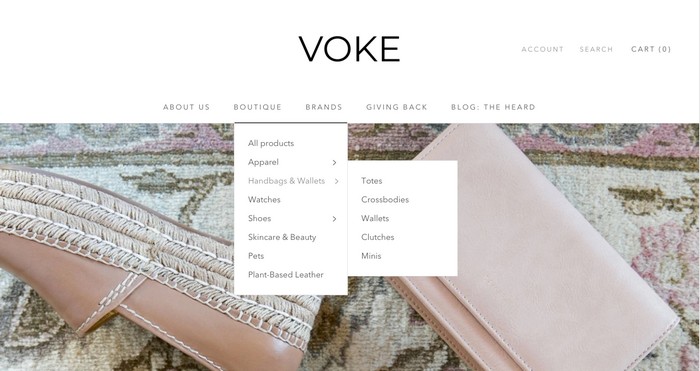
It’s always best to create your collections for your customers first and SEO second. Google is sophisticated enough to know when you’ve created user-unfriendly collections resulting in dropdown menus with 100+ items on them.
Luxury Vegan Brand boutique, Voke have their collections well-structured and simple to navigate.
Doing some competitive analysis is always a good idea to see how your competitors organize their collections and which keywords they are targeting with each collection page.
As a rule of thumb, you’ll want to keep things as simple as possible for your visitors and choose one keyword for each collection. Don’t be tempted to create a collection for each target keyword within a cluster of related keywords, it will kill usability by confusing your customers and your sales will suffer as a result.
Just make sure that the keyword is included in the URL of the collection name as well as the title for that collection.
Klevercase’s Kindle paperwhite collection is their most trafficked collection page that’s keyword specific.
Larger stores with a diverse range of products have a more complex job on their hands. If you have a large store that’s dependent on organic traffic then you’ll need to do some deep keyword research and organize your collections according to high-volume target keywords.
You can also do some user testing and heatmap analysis to help understand how visitors navigate your collections.
Part 3
This is Part 3 of a 4 part series of Shopify SEO
If you want to shortcut a lot of the SEO headaches, the Shoptimized™ Theme is renowned as one of the fast-loading Shopify themes to consider. If you’ve read the previous articles in this series, you’ll know how important page-load speed is to top rankings in Google.
Sitemap Status
Google already knows about your store’s sitemap from your robot.txt file that we mentioned earlier, so the main thing to understand about your sitemap is that you’re submitting it purely to help identify errors inside your Google Search Console dashboard. Once you’ve identified any errors, then you can fix them.
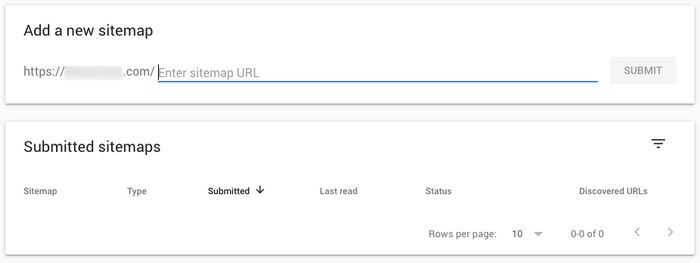
Inside GSC click on ‘Crawl’ then ‘Sitemaps’. If there isn’t a sitemap you’ll need to submit yours pronto.
The above site hasn’t submitted its sitemap. This should be a top priority.
To submit your sitemap to GSC, paste your URL as below:
http://yourstore.com/sitemap.xml
http://yourstore.com/sitemap.xml
Canonicalization is effectively streamlining pages when there are multiple versions of the same page. Having a single version of a page eradicates duplicate content issues (which Google will penalize you for) and helps build the link value of your pages.
There can be between three and five versions of any Shopify page:
http://yourstore.com
http://www.yourstore.com
https://yourstore.com
https://www.yourstore.com
http://your-store.myshopify.com
All of the above versions need to be directed to a single page. Number 3 on the above list is preferential as it’s easier to read without the ‘www’ prefix. It’s a no-brainer that you should be using HTTPS.
You can easily set up page canonicalization in Shopify under ‘Online Store’ > ‘Domains’ then select ‘Redirect all traffic to this domain’.
rel canonical
The rel canonical tag on a page tells the search engines the preferred version of your page that you want them to index.
The tag is critical for stores with variants and collections because these will alter the URLs.
When a variant is selected you’ll notice the URL gets appended with a query string for example:
?variant=39568359751742
Whenever a product is in a collection, Shopify creates a new URL for the product. If for example, a product is in two different collections, it has two collection URLs in addition to its main product URL:
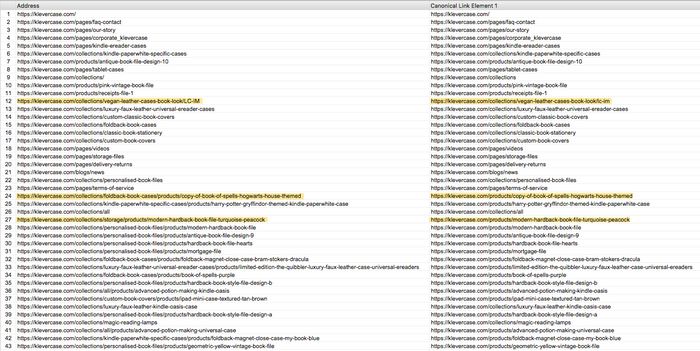
Use Screaming Frog (as mentioned in part two of this series) to quickly scan for canonicalizations. Below, you can see three examples of products that have a canonicalized version that differs from the primary URL:
Screaming Frog will quickly show you any canonicalization issues.
Whenever the canonical version of one of your product pages is yourstore.com/products/product-name, it usually means that you have everything set up correctly. The only caveat is if a developer has added conditional statements around the canonical tag.
Check the liquid template for the following code, if it’s missing add it between the <head> and </head> tags in your theme.liquid file:
You can also follow the ‘Directives’ tab in your Screaming Frog scan. If your scan reveals no use of rel canonical or incorrect use, add the above code.
HTTPS
This is a no-brainer and in fact, Shopify forces all new stores to use HTTPS. If your store is older and still using HTTP URLs then it will be suppressed by Google so it’s a good idea to switch.
It’s easy to set up an SSL certificate inside Shopify and then claim your HTTPS URL. All of your previous HTTP URLs will automatically be redirected to the HTTPS version.
If you have various different storefronts for different countries then this section of the guide is for you. This can be achieved using multiple websites, sub-domains, or folders that a visitor sees depending on which country they are browsing from.
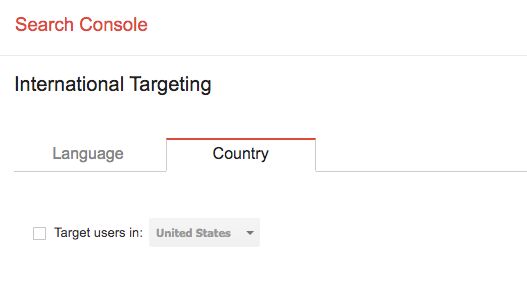
It’s important to associate the appropriate county with the correct website inside your GSC dashboard. Google is sophisticated enough to do this automatically for top-level domains like co.uk for the UK. Otherwise, you’ll have to configure it yourself.
This example store has no country targeting.
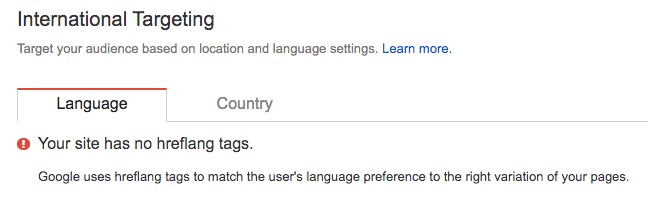
Language Targeting
It makes sense that your store should show content to your visitors in their own language, it will dramatically reduce the bounce rate for international visitors and improve conversions.
You can also configure the language targeting option in GSC:
This example store has no language targeting.
If your store has multiple languages, use the hreflang tag. Most Shopify stores won’t have this set up already, so if you want to target Spanish speaking customers, for example, you could use a multilingual folder structure and redirect visitors from Spanish speaking countries to the Spanish version of your page by adding the following code to the English version of the homepage:
You can write custom Liquid code so the hreflang is functional for multilingual stores. The precise solution will depend on your store’s URL structure. If you have a UK store with identical pages to your US store, insert this code on the UK store:
Of course, you could just use an app like Multi-Store Hreflang Tags to make it simple to manage multiple stores and protect your SEO.
Javascript & CSS Disabled
For the most part, search engine bots view your store in HTML so it’s a good idea to check your store’s appearance when javascript and CSS are disabled. Plus, although it’s extremely rare, some people disable CSS & javascript on their browsers.
Browseo is a great, free tool to use. Here’s what you should be checking for:
Are all menus visible?
Are all links clickable?
Is unimportant content appearing above more crucial content? If so, move it down the page.
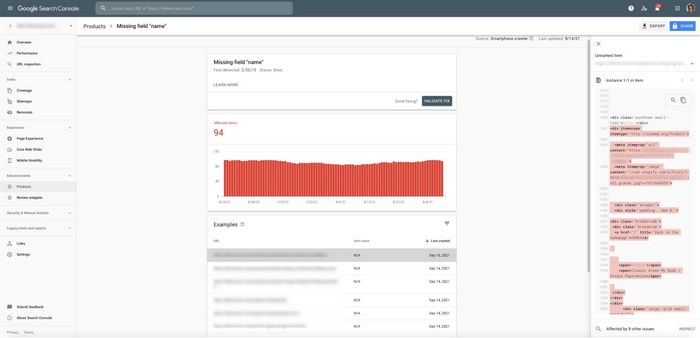
Structured Data Errors
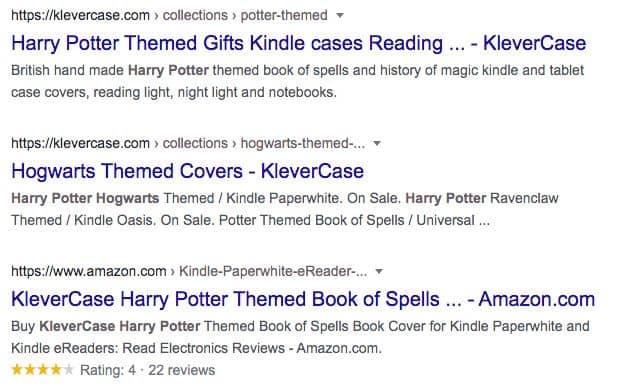
When your store appears on the Search Engine Results Pages (SERPs) it can have a nicer markup in some cases. This is sometimes called ‘markup’, ‘schema’, ‘structured data’, or ‘rich snippets’.
You’ll find two useful tools here for reviewing your structured data and optimizing it in real-time.
In the example below, Amazon’s listing is displaying the rich snippet with the review ratings, whereas Klevercase’s own store is displaying as standard.
Rich snippets make a listing stand out like the Amazon listing above.
The reality is that rich snippets affect the click-through rate to your store and how visitors perceive your store. Even if you have glowing 5-star reviews on your store’s product page, an aggregate 3-star Amazon rating displayed in the SERPs can hurt your sales.
Using scheme markup does not guarantee that your listings will display it in the SERPs but without it, you have zero chance.
With that said, every Shopify store should use at least three types of markup:
Semantic markup for products
Semantic markup for reviews
Semantic markup for the product offering
Semantic Markup for Products
Without fail, your store should be using product markup. This will include things like the brand, GTIN/UPC number, color, etc. The full documentation on this can be found here.
Markup errors
Below is a simple example of schema markup for a typical Shopify product:
<div itemprop="offers" itemscope itemtype="http://schema.org/Offer">

<link itemprop="availability" href="http://schema.org/{% if variant.available %}InStock{% else %}OutOfStock{% endif %}">

<meta itemprop="priceCurrency" content="{{ shop.currency }}" />

<meta itemprop="seller" content="{{ shop.name | escape }}" />

<meta itemprop="itemCondition" itemtype="http://schema.org/OfferItemCondition" content="http://schema.org/NewCondition" />

<meta itemprop="price" content="{{ variant.price | money_without_currency }}">

<h1 itemprop="name">{{ product.title }}</h1>

</div>
Semantic Markup for Reviews
If your store is brand new you might not have any reviews yet but if you already have some, it makes sense to showcase them in the Google SERPs. Most of the well-known review apps use the correct schema but if you need it, you can go to https://schema.org/AggregateRating for the full documentation.
Puravidabracelets.com is correctly using the AggregateRating markup as well as the Product Offer markup
Semantic Markup for the Product Offer
The offer schema shows up as the ‘In Stock’, currency, and price in the SERPs – see the example above.
Below is what the source code looks like for the example above:
As before, you can check the full https://schema.org/Offer documentation to make sure you’ve optimized it correctly for your store.
Semantic Markup for the Collection Pages
Every collection page on your store should use the CollectionType element along with ListItem for each product on a collection page.
At the time of writing Google doesn’t alter the search results based on the collection page schema markup but it won’t do any harm having everything ready for that day if it ever comes.
See the example below of how to correctly configure your collection page markup:
Bradley is a Conversion Rate Expert and store owner since 2005. He’s helped some of the world’s most sophisticated brands to double and sometimes triple their conversion rates. He architected the #1 unofficial Shopify theme, Shoptimized™ and is also CEO of Funnel Buildr, the perfect tool for massively growing your store’s Average Order Value.